Showing posts with label free motion quilting. Show all posts

Sunday, June 14, 2015

FMQ Update

It's true that "Practice, practice, practice" does improve your free motion quilting.  Thanks Janet!  I'm getting the hang of it.

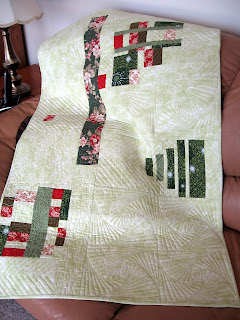
I had posted here about two lap quilts that I was going to free motion.  At first all that negative space seemed daunting.  After several days of procrastinating, I said "Just do it".  Well,  here is the first one.
Hard to see the quilting in that picture, so here are a couple of close ups.

I've called it "Modern Fassett"  What do you think?

Okay, so now I started to feel a bit more confident, so I took on the second one.  Called it "One Fell Out" after the little red square on the left.
Here is the detail on this one.

Hey this is getting easier and easier.  I'm off to see what other quilt sandwiches I can conquer.  Till the next time, thanks for visiting.

Friday, March 27, 2015

A cover up

My Guild meets in the fellowship hall of a local church.  The church had recently installed a new electrical panel  front and centre above their coffee counter.  The Guild was asked if someone would be willing to create something that would cover that electrical panel.  Along with two others (Catherine, Shirley and Deborah) I stepped forward.  Yes, yes I know I have other projects to finish, but remember my word for 2015 is BEGIN.  So I began another one.

We started with orphaned blocks that were left in the Guild's "scrap stash".  I thought they would look good along the borders.


We measured and measured again and determined what was needed was a rectangular piece.  Using some coffee themed fabric we stitched additional borders.  They're marked "2" and "3" in the picture below.

Yes that's right...we were working from the outside in. Next came some simple nine patches for fillers and paper pieced coffee mugs.


We now needed something to tie all the pieces together.  Shirley experimented with machine embroidery.  She had chosen a wonderful way of doing some embroidery so that it formed a sort of "crossword" centre.

Notice that certain letters are capitalized?  You'll see in a minute why she did this.  We needed something more to fill in the spaces; some pieces were fussy cut and others simple fabric squares.  Here is Catherine auditioning fabric for additional sashing.


With some additional piecing, the top was finally ready for sandwiching and some fancy free motion quilting.  Deborah added her flair and VOILA!!!  Done and presented to the church.  Here is the completed wall hanging.


The wall hanging is centered over the electrical panel and can be easily slid out of the way if the panel needs servicing.  Oh yeah!  See how the capital letters spell out "COFFEE"?  It was challenging working from the outside into the centre.  When it was presented this month, the pastor and staff's eyes glistened and smiled.  It was an enriching experience.

Monday, March 2, 2015

Busy Beginning

Funny how time just gets away from you when you aren't paying attention.  I've been focussing on beginning several projects and completing some of them.  I finally managed to finish my piece I called "Light Switches".  I showed a picture of the unfinished piece here and here.  It's finished now and as luck would have it, it hung in a local gallery.  Here is what it looked like in the gallery,

I donated the piece for their fundraiser "Almost Famous".  You can read about the fundraiser here.

I also finished the quilting on the "Three Gals at the Beach" which I posted about here.  This close up shows some of the free motion quilting I did on it.

Next time I'll show you the place mats that were made by a small group quilters at the local seniors centre.  

Monday, October 6, 2014

I've been knotty

No, no I did not spell "knotty" incorrectly;  I'm talking about Celtic knots.  A recent retreat gave me the opportunity to learn how to design those knots. I was prepared to cut and work with bias strips, but discovered that you can create knots with just some free motion quilting.


After some preliminary instruction I got good and "knotty" and designed several knots.  I chose to work two of them in fabric.  They are still at the basted stage, but here is the result.


They'll make wonderful cushion covers, don't you think?

Because I knew the theme of the retreat beforehand, I also brought along a quilt top that I thought would benefit from some Celtic knot work.  What better place to get assistance than at this retreat?  It presented a challenge because I was trying to add the knot to corners rather than in a circular pattern.

After several attempts, I came up with a design that I liked.  This too is basted and will need to be appliqued in place.

Once the knot work is stitched in place I'll have to decide if I'm going to hand or machine quilt this. Any thoughts?

Till the next time,

"When you get to the end of your rope, tie a knot and hang on." - Franklin D. Roosevelt.

Sunday, August 24, 2014

Charms, Feathers and Mardi Gras

Lisa, my friend over at Tangled Textiles, mailed us an envelope that had hand dyed fabric, charms and fiber and challenged us to create something.  Her words were " use some (or all, if you choose) of the fabric, and at least one of the charms.  If you find some fibers in your packet, please use it/them in some way..."  Okay this was somewhat daunting for me.  I've been accustomed to working from a "theme" as in "music", "architecture".  Get the picture?  I had to really think about what to do with these materials.
 Here is a close up of the charms,
and the fibers.

I thought about what to do, sketched ideas, thought some more, and came up empty.  As months went by I was running out of time.  I pinned the items to the design wall and about three weeks ago, it came to me. The colours were bright, joyful, and vibrant.  Ahhh!  An epiphany!!  These materials conjured up an image of Mardi Gras for me.  I had to get that image down on paper before it disappeared.  Now to get the piece done in time.

I needed to find some background fabric to act as a canvas for my idea.  I chose a neutral piece that would allow me to add some stenciling.  I had the perfect stencil to use and chose to use blue and green Shiva paint sticks.

You can see the stencil in the backgound, or here or on the Tangled Textiles site.  Next I pressed the fabric to Misty Fuse and after some fussy cutting and a template I had this.


I slashed the blue and green portions of the fabric to give me strips.  It ended up looking like this.

It was time to layer the pieces together on the background and do some free motion stitching to hold things in place.


But before I could completely fuse everything embellishing was the next order of business.  I added some feathers and then fused the remaining piece in place.


Additional feathers were added and then the charms and fibers.  Some hand embroidery and machine stitchery completed the picture. There was sufficient fabric left over to create the binding.  

Voila! The final result!

As for what was left, here is a picture of the remnants.

Saturday, March 22, 2014

Tumbling with Artistic Licence

It's taken me some time to come up with an idea for the Tangled Textiles challenge theme "Artistic License".  From the time it was announced by Judy, several events have intervened and now I'm late.  I've been away (more about that in another post).  Oh well, best get on with it.

I had attended another session at Asilomar this year and took a class with Sue Benner.  Her class was a study in rectilinear, curvilinear, and cut and collage design.  It was while working on my rectilinear design that my idea came to me for Artistic License.  My rectilinear piece had blocks that looked like they were tumbling.
The way my mind works, one thing lead to another and before I knew it, other block settings were brought to mind, in particular Tumbling Blocks.  I viewed many settings of this particular quilt block and even noticed that the National Quilt Museum in Paducah, Kentucky has a contest entitled "New Quilts From An Old Favorite".  Tumbling Block had been chosen for the 2002 contest.

Artistic License gives me the freedom to take something, change it, and still have it be recognizable.  How to portray Tumbling Blocks differently and still make sense.  At the same time use what I learned in Sue Benner's class and change it.

First I made a staircase using rail fence blocks with this fabric.
 

Next I chose a variety of fabrics like jacquard, gold lame and fabric I had painted.  I cut these into squares and frames, fused them together
 and fused them onto the background.  


Although I had placed some of the blocks to appear as though they were tipping off of the edge of the stairs, it still needed something more.  Quilting would do the trick and perhaps a few smaller squares to look as though they were tumbling out of their "parent".
 So after some initial tweeking (read that as reverse stitching) here is the resulting piece.
Taking artistic license a bit further, I've called it Blocks Tumbling...go figure... Oh well for what it's worth, there it is.  Go on over to Tangled Textiles blog and see what the others did.


Wednesday, May 1, 2013

Remnants are revealed

It was reveal day over at Tangled Textiles yesterday.  Go have a look! Everyone is showing off their interpretation of the theme "Remnants".  This is my piece and yes, it still needs to be bound or faced.  I am waiting to see what my TTs suggest.
My initial idea was to rust fabric.  I had never done that before and thought using some rusted fabric would add to the idea of a remnant piece of cloth.  Well the rusting did not happen.  Instead I decided to go in a different direction, which I  suspected would take a little less time.  I scorched pieces.  The quilt has a pieced background, FMQ (which is hard to see in this photo), and applique. 

This piece represents the remnants left after a fire has roared through a home leaving behind the remainder of furniture, appliances, photos and family heirlooms.

Wednesday, October 24, 2012

Beginning Reveal

Today is reveal day over at Tangled Textiles for the last in our Theme challenges.  Vicki picked this theme and you can read some of the challenges that all of us faced.  Here is my piece, which I have called Fowl Beginnings.
 
One of the challenges that I faced for this piece included curved piecing.  I used this to created the branches in the piece.  As you can see the curves were simple and few!!

 
I added leaves using fused applique...(oops picture is on its side, but you get the idea)

 
 and set myself to adding a nest using wool roving, some feathered fur and some dyed kunin felt that I distressed.  I used fine tulle to hold it in place till I could stitch it down.


It didn't look the way I had envisioned it so I added some decorative wool to the edge to create some additional depth and texture.  The sewing machine foot kept getting caught in the wool, so I covered this with tracing paper and stitched it all down.  This is what it looked like.


I tore away the paper and then added eggs.  I used a pigma pen to create the cracks in the egg and a tiny sliver of yellow felt for the beak.  Do they look like they are ready to hatch?
 
 
Whew!  I managed to try some things that I had not done before and I must admit, even though frustrating at times, it was fun to see the idea I envisioned turn into a reality.
 
Stop by the Tangled Textiles blog and see what the others came up with.
 
Till the next time,  keep stitching.